Flowers have always been a source of inspiration for creativity, whether it is for drawing, painting or even decorating, they’re beauty just adds a touch of elegance. If you are looking to draw flowers for your own hobby, whether that be for your sketchbook or journaling, then this step-by-step drawing guide on how to draw flowers will be perfect to follow.
With many different flowers to choose from, it can get overwhelming on what to draw and even how to start. Flowers come in all shapes and sizes, but in this blog post you will find that drawing flowers can be made very simple.

We have 10 flower drawings to follow, by the end of each step, you will have a lovely flower that you can draw over and over again. Whether you want to add color to it or leave it as a simple drawing, the options are endless.
The post contains affiliate links with no extra cost to you 🙂
art supplies
Below are a few art supplies that can help you with your flower drawings.
Sketchbook – Having a good sketchbook is a must for drawing, because paper matters!

- MOLESKINE ART COLLECTION: From sketchbooks and sketchpads to watercolor notebooks with heavy paper,…
- DURABLE COVER & ELASTIC CLOSURE: Hold writing projects & notes in your Moleskine notebook with an…
- GIFT QUALITY NOTEBOOKS: Moleskine planners, journals and notebooks come in hardcover or softcover…

- CONVENIENT DESIGNS FOR SKETCH DRAWING: The sketchbook designs with durable spiral bound and die cut…
- PREMIUM AND DURABLE PAPER: The sketchbook includes 80 sheets 90gsm paper, the durable sketch paper…
- LARGE SIZE WITH PROTECTIVE COVER: 1 pack of 8.5×11 inches sketchbook, the large size provides…

- Artist-Recommended Sketch Paper – Loved by artists for decades, Strathmore 400 Series Sketch paper…
- General Purpose & Heavyweight – Tackle sketch projects like figure drawing, illustration, and…
- Use with Multiple Materials – Paper is intended for practicing techniques with graphite pencil,…
Pens & Pencils – Usually drawings will start off by pencils and then go over in pens, these pens and pencils below will help you in the process.

- VERSATILE GRAPHITE PENCILS – Faber-Castell graphite pencils are a diverse and versatile tool for…
- SKETCHING PENCIL SET – Includes 6 artist quality Faber-Castell graphite pencils in various degrees…
- BREAK-RESISTANT LEAD – Faber-Castell graphite pencils feature a break-resistant lead that is glued…

- ❤Muchcute 12 Black Drawing Pens: The professional micro pen kit contains assorted types of pen…
- ❤Waterproof Archival Pigment Ink: Don’t let bleed and smudges ruin your artwork. Our archival…
- ❤Smooth & Skip-Free Nylon Nib: Our nib is made of high quality nylon. The premium different tip…

- · PRECISION DESIGN – Metal-clad 0.3mm tip creates fine lines for detailed art and drawing. These…
- INNOVATIVE STORAGE – Standing easel case keeps these triplus fineliner pens organized and readily…
- ·EXTENDED LIFE & WASHABLE – Dry-safe felt tip pens remain usable even after days uncapped….
Now that we have all that we need for drawing, let’s get into the step-by-step flower drawings!
Flower Drawing – Step by Step
Flower 1
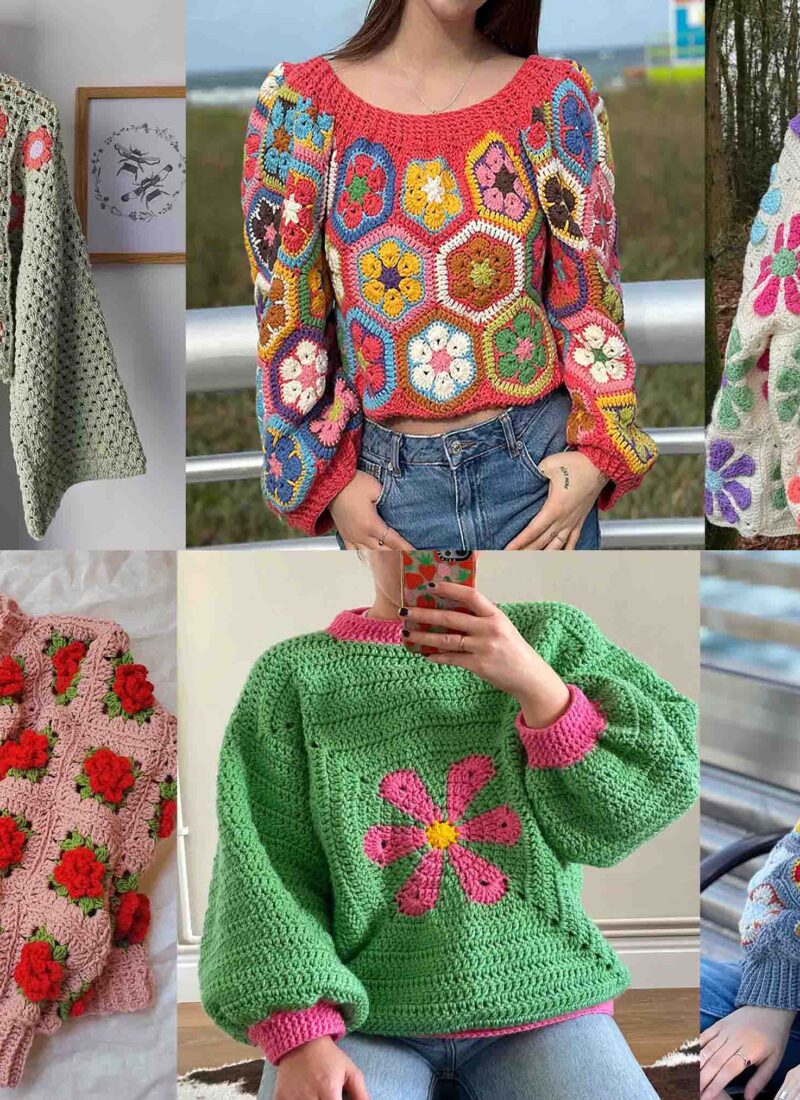
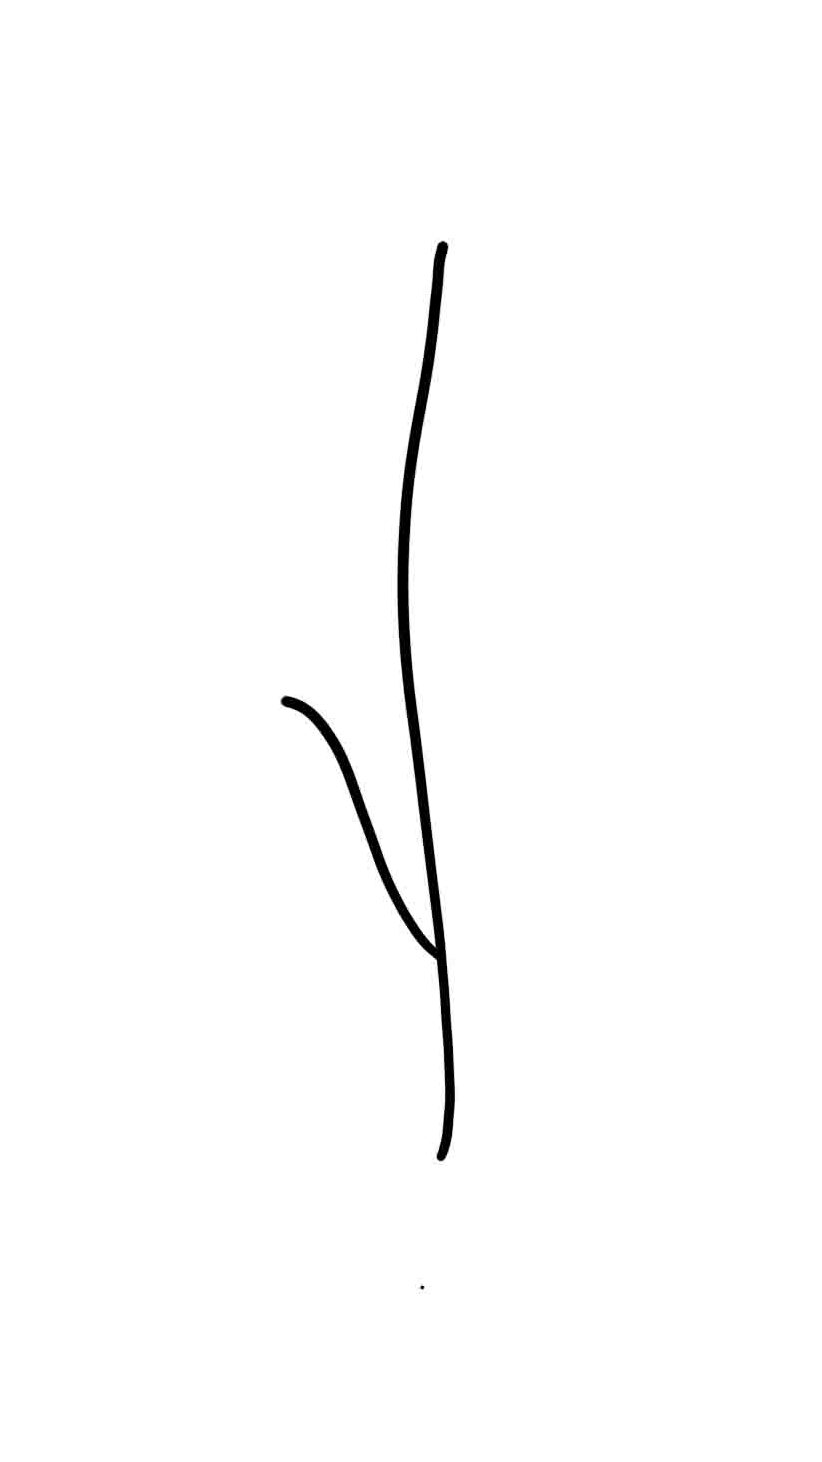
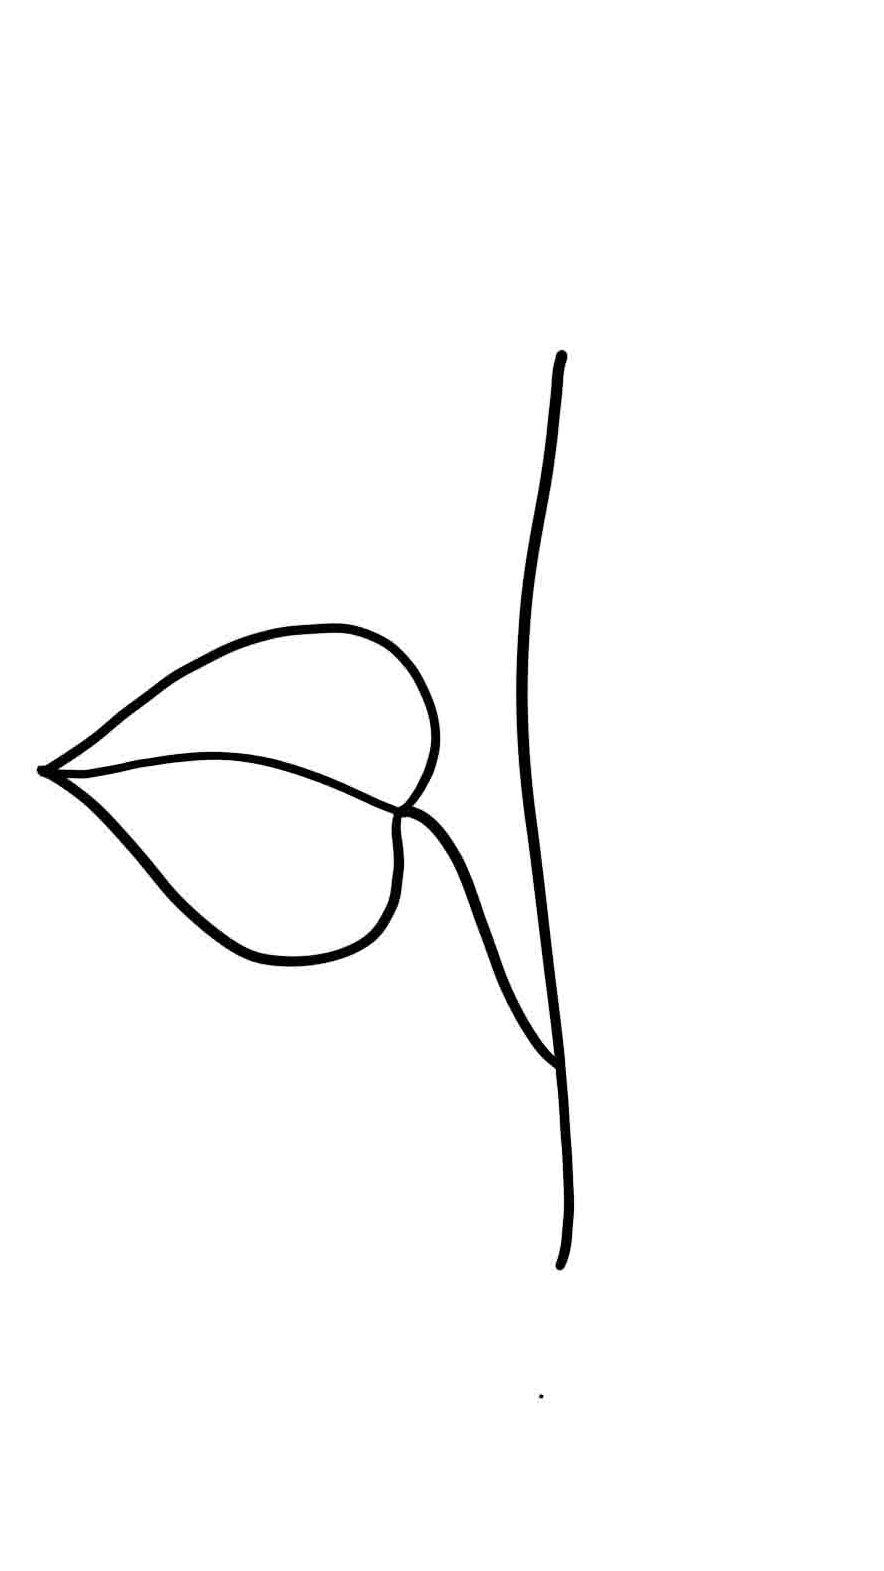
Let’s start off with this very simple two petal flower drawing, that is only a few steps. A cute dainty flower that looks nice and can be very decorative on a page.

Step 1
Start off with a simple stem, make it nice and curvy towards the top and not too rigid.

step 2
Draw in small little leaves at the top of the stem. The leaves should be going in different directions, two facing upwards and one facing down.

step 3
The final step is to draw in two big petals to form the side of the flower and you are done!
Flower 2
Next up is a daisy style very rounded flower, with lots of petals. Another simple and easy one to draw in a few steps. This flower will look great colored in yellow or any bright color.

Step one
Start off with a nice curvy stem again.

step two
Draw in a round circle for the centre of the flower. This will be where the petals take shape. Be sure to not make it too far away from the stem, otherwise the petals will be too long.

step three
Start to work in the petals around the centre. Turn your sketchbook around as you go, as this can help with the petals being in different directions.

step three
Fill in the rest of the petals behind the front petals to make the flower nice and rounded, and there you have your completed flower drawing.
Flower 3
Another pretty five petal flower with a big leaf. This reminds me of a summers day big and bright.

step one
Start off with a simple stem and a little stem for the leaf going out towards the left.
step two
Draw a big leaf shape on the stem and a line going through the leaf to give it some character.
step two
Draw a little centre just above the stem, but don’t make it too rounded to give it some shape.

step three
Draw in the five petals around the centre. Don’t be too perfect with the lines and let them be a bit wavy. It’s what makes this flower!

step four
Finish up by doing a few lines inside the petals and there you have it.
Flower 4
Next up is this lopsided flower, just to give some variety into the mix.

Step one
Start off with a mid size stem, and draw in two lone leaves on either side of the stem.
step two
Draw an upside-down wavy centre for the middle of the flower.

step three
Finish off by drawing four long petals going from the centre to the stem and you are done.
Flower 5
Next up is this little decorative flower, another simple flower drawing but looks really nice.

Step one
Draw a long stem with two leaves pointing upwards.

step two
Draw in the little leaf shapes just above the stem.

Step three
Next up is the three small petals just above the stem.

step four
Lastly draw in the little details, like the lines inside of the petals and leaves, and in between the petals.

Flower 6
This flower looks complex but I promise it’s not! Let’s take a look at it step by step.

Step one
Start of with the simple stem and two mini stems going out from the main stem.

step two
Lets start to give the flower a bit of shape by drawing in the first rounded petal. The other two petals will work around this petal.

step three
Draw in the next two petals around the last petal.

step four
Draw the little stems going out of the main stem, two batches on each side.

step five
Draw in the spikey leaf shapes on the side stems.

step six
Finish up by drawing in the details inside and on the petals.
Flower 7
Next up are these spring ‘bell’ style flowers.

Step one
As usual start off with the stem and stems on either side of the main stem.

step two
Draw in the three ‘bell’ flowers with pointy petals.

step three
Create striped lines inside the flowers for the detail.

Step four
Lastly draw in the leaves, but make sure they are rounded at the top edges.
Flower 8
Here we have another full on flower with a few buds and leaves.

step one
Start off with a thicker stem and two thinner stems growing out from that. Then draw a smaller bud to from where the little petals will grow from.

step two
Next draw out the leaves on each of the stems.

step three
Draw on the lines for the leaves and just above the stem and draw two little petals on the small bud. Just above the stem, draw a small circle.

Step four
Bringing the flower to life, draw five big sized petals around the centre.

step five
Finish up by drawing in lines from the centre to give it the extra details.
Flower 9
Another pretty flower, similar to the one before and has lots of character.

step one
Draw the simple stems of the flower.

step two
Next up is the small leaves coming out of the stems.

step three
Next is the small leaves around the bud and then draw the bud in between those leaves.

step four
Draw the centre and fill it in.

step five
Draw out the five petals of the flower, be sure to draw in one petal behind to give it a quirky look.

step six
Finish up by drawing in the lines on the petals to bring it all together!
Flower 10
Last up is this gorgeous daffodil drawing in just four easy steps.

step one
Draw in a stem, with the second stem curling into the main one.

step two
Next draw out the starting points of the buds, make them nice and pointy.

step three
Now it’s time to draw out the main flower with the petals coming out. Take your time with this to make it right. Start off from the bottom of the flower and work your way up to the main petals.

step four
Finish up by drawing in the lines on the flowers to give it the finished look and there you have your lovely daffodil!
This comes up to the end of our flower drawing! As you can see, drawing flowers doesn’t have to be difficult as long as you do it step by step and just take your time with it.
Whether you are drawing for your sketchbook, a project or just want to brush up your drawing skills, then I hope you have found this post useful.
If you loved this post, be sure to check out our other drawing and painting inspired posts below:
Create Easy Zentangle Art: A 10-Step Guide to Fun Patterns.
How To Paint A Loose Yellow Rose In Watercolor, The Easy Way.
Master Loose Watercolor Florals with These 20 Simple Designs.
Be sure to give this post a share on Pinterest and give us a follow! Happy Drawing.