If you are looking for some Zentangle pattern inspiration, you have come to exactly the right place.
Whether you are a seasoned tangle artist or picking up a pen for the very first time, this collection of 11 beautiful step-by-step patterns has something for everyone.
Pin me for later!
From delicate florals and flowing organic shapes to bold geometric designs and satisfying repeating tiles.
One of the most wonderful things about Zentangle is just how accessible it is. Each pattern in this post is broken down into simple, manageable steps so you can follow along at your own pace and in your own time.
There are no deadlines, no pressure, and absolutely no mistakes — just you, a pen, and a blank tile waiting to be filled.
In our busy, screen-filled lives it can be surprisingly rare to find an activity that truly brings you into the present moment — but Zentangle is one of them.
The slow, repetitive nature of drawing patterns has a natural way of quieting the mental chatter that follows us through the day.
As your pen moves across the page, your focus narrows to just that single stroke, that single line — and without even trying, the noise of the outside world begins to fade.
Many people describe it as a moving meditation, a way of winding down the mind without having to sit still and force it to be quiet.
The more you practise, the more you will notice this shift — that gentle settling of the mind that comes from being fully absorbed in something calm and creative.
And at the end of it, you have a beautiful piece of art made entirely by your own hand, which is a pretty wonderful bonus.
So find a comfortable spot, gather your supplies, and let’s dive into these 11 stunning Zentangle patterns.
One stroke at a time, let’s make something beautiful.
1st Zentangle Pattern
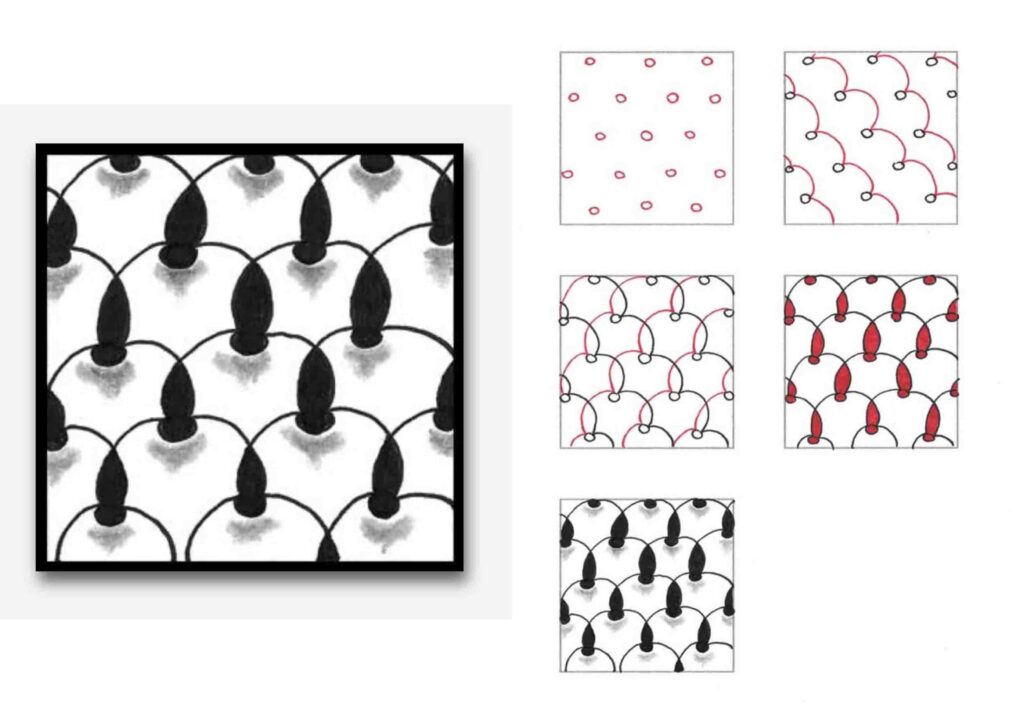
Step 1: Lightly draw small evenly spaced circles across your tile in a staggered grid, making sure the rows are offset from one another to keep everything evenly placed.
Step 2: Connect the circles with simple arched lines, linking each one to its neighbours to create a neat repeating scallop pattern across the tile.
Step 3: Add a second layer of arching lines sitting above the first, filling in the gaps between the scallops and creating small teardrop shapes where the two layers of curves meet.
Step 4: Fill in each teardrop shape with solid colour, making them stand out clearly against the white background and giving the pattern a bold, repeating quality.
Step 5: Fill the teardrops with solid black and add light pencil shading just inside each scallop arch, gradually building up the tone to give each section a sense of depth and dimension.
2nd Zentangle Pattern
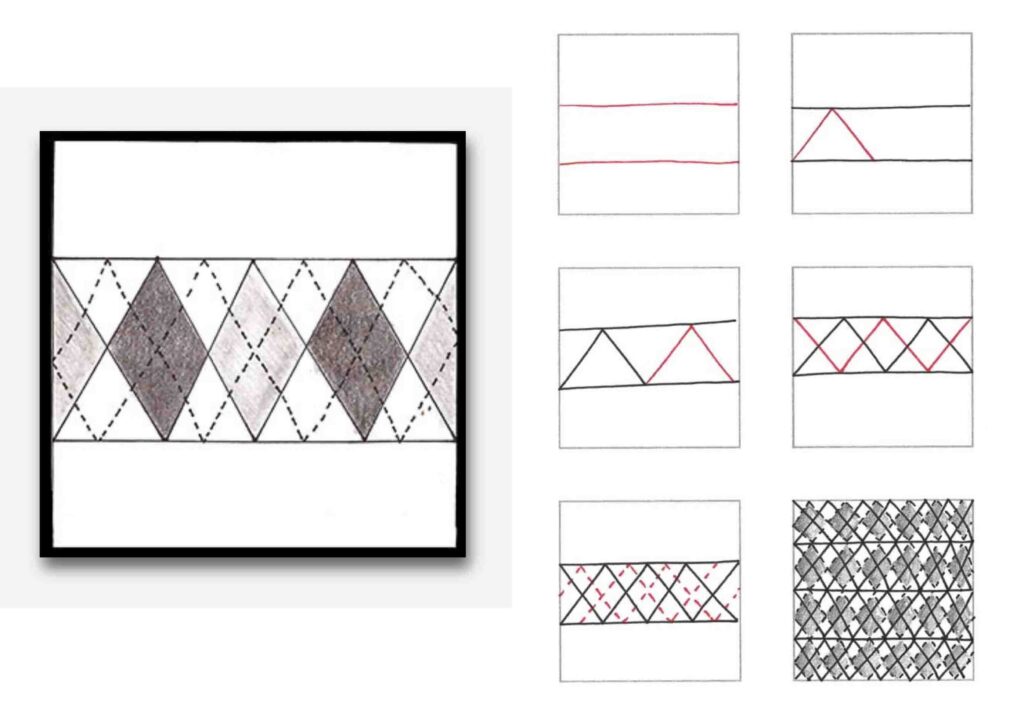
Step 1: Draw two horizontal lines across your tile, one near the top and one near the bottom, creating a wide band to work within.
Step 2: Draw a triangle pointing upward between the two lines — just two diagonal lines meeting at a peak, sitting on the bottom line.
Step 3: Continue adding triangles side by side across the band, all the same size, until you have a neat row of them stretching from one side to the other.
Step 4: Now draw a second row of triangles pointing downward in the gaps above the first row, so the peaks and valleys interlock and the whole band fills with diamond shapes.
Step 5: Add small diagonal tick marks inside each diamond shape — just a couple of short strokes sitting at an angle — repeated consistently across every diamond in the band.
Step 6: Fill the alternate diamonds with pencil shading, darkening every other one to create a strong checkerboard contrast. The tick marks and shading together give the finished band a rich, woven textile feel that looks far more complex than it really is.
3rd Zentangle Pattern
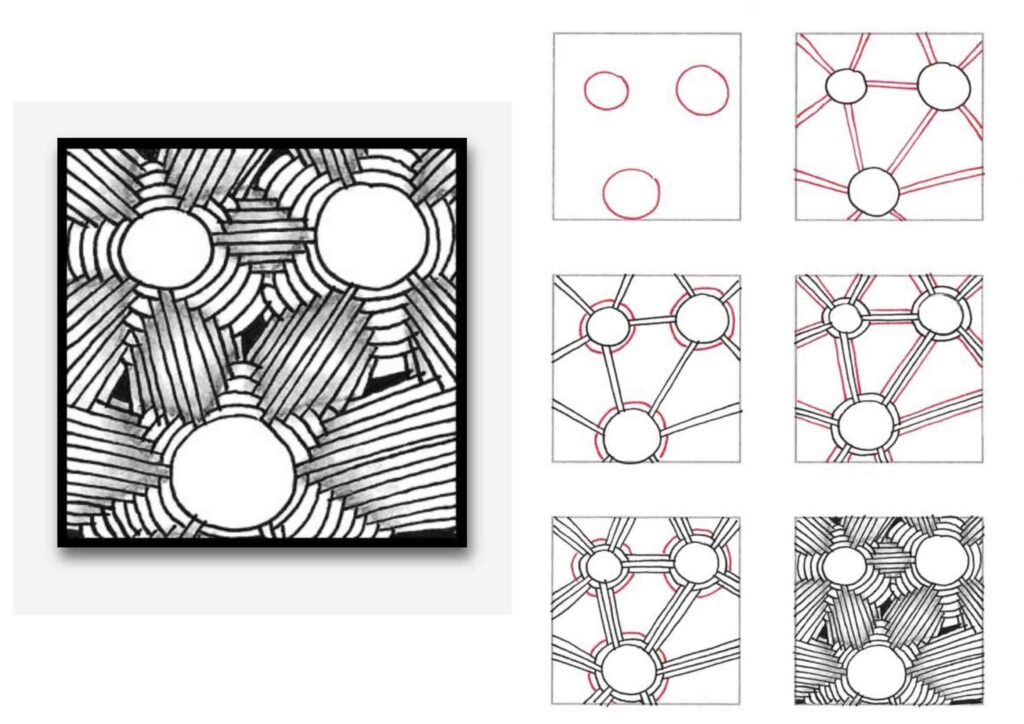
Step 1: Draw three circles scattered across your tile in a loose triangular arrangement — these are the hubs of your pattern and everything else will grow outward from them.
Step 2: Connect the circles to each other and to the edges of the tile with pairs of straight lines radiating outward, like spokes on a wheel, forming an irregular web across the page.
Step 3: Add a smaller circle just inside each hub circle, and draw curved lines connecting the spokes as they meet each circle, creating neat rounded junctions where all the lines come together.
Step 4: Double up all the connecting lines between the circles, drawing a second line running parallel to each one so every spoke becomes a defined channel or pathway across the tile.
Step 5: Continue adding more parallel lines to each spoke, building them up into thick bundled strands that radiate from every circle like a dense, woven network stretching across the whole tile.
Step 6: Finish with pencil shading along the edges of each bundle of lines, darkening the outer edges and leaving the centres light to give every strand a rounded, rope-like quality — the result is a wonderfully intricate pattern that looks like a piece of woven basketwork.
4th Zentangle Pattern
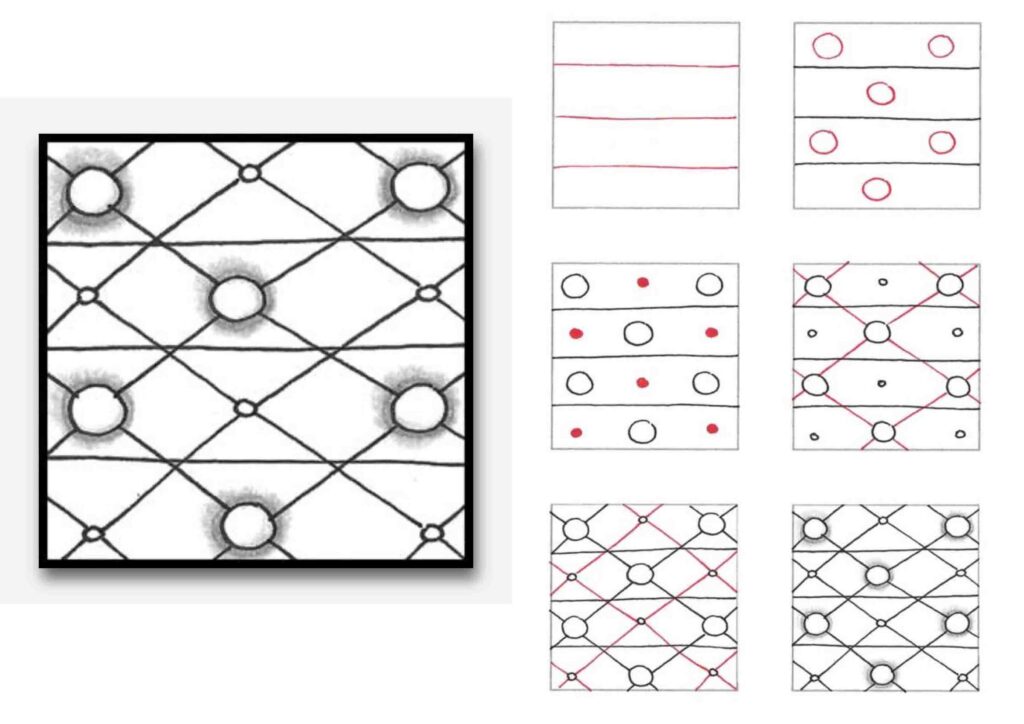
Step 1: Draw three evenly spaced horizontal lines across your tile, dividing it into four equal bands.
Step 2: Draw circles in a staggered pattern across the bands — two circles in the first band, one in the middle of the second, two in the third, and so on, alternating as you work down the tile.
Step 3: Add a small solid dot in the gap between each circle, filling in the spaces in the staggered arrangement to mark where your diagonal lines will cross later.
Step 4: Draw diagonal lines connecting all the circles, crossing through the dots and running corner to corner across the tile to create a diamond shaped lattice linking everything together.
Step 5: Add a second diagonal line running parallel to each of the first, and place a tiny open circle at every point where the diagonal lines cross, giving each junction a neat, finished look.
Step 6: Finally, add soft pencil shading around the outside of each circle, darkening the area just behind them so they appear to sit on top of the lattice like smooth round beads, giving the whole pattern a lovely three-dimensional quality.
5th Zentangle Pattern
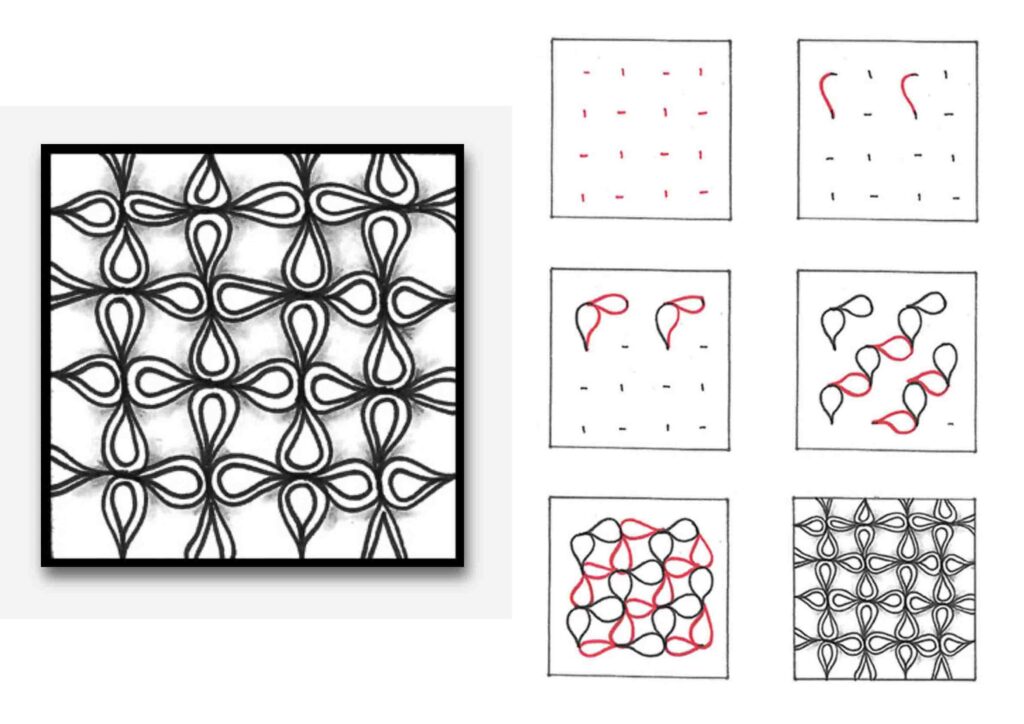
Step 1: Lightly mark a staggered grid of small dashes across your tile — alternating horizontal and vertical dashes in neat rows — to act as placement guides for your pattern.
Step 2: At each horizontal dash, draw a soft S-shaped curve with a small loop at the top, like a little upside-down hook or a curling leaf beginning to unfurl.
Step 3: Complete each motif by adding a pointed teardrop shape at the base of the curl, giving every unit a elegant comma-like form.
Step 4: Connect the motifs together by adding a flowing curved line that links each one to its neighbours, so diagonal chains of curling teardrops begin to snake across the tile.
Step 5: Add a second layer of connecting curves running in the opposite direction, weaving between the first set of chains until the tile is filled with interlocking loops and teardrops in every direction.
Step 6: Ink over all the final lines cleanly and add light shading where the shapes overlap — the finished result is a stunning, almost floral lattice that looks intricate and symmetrical but is built entirely from one simple repeated motif.
6th Zentangle Pattern
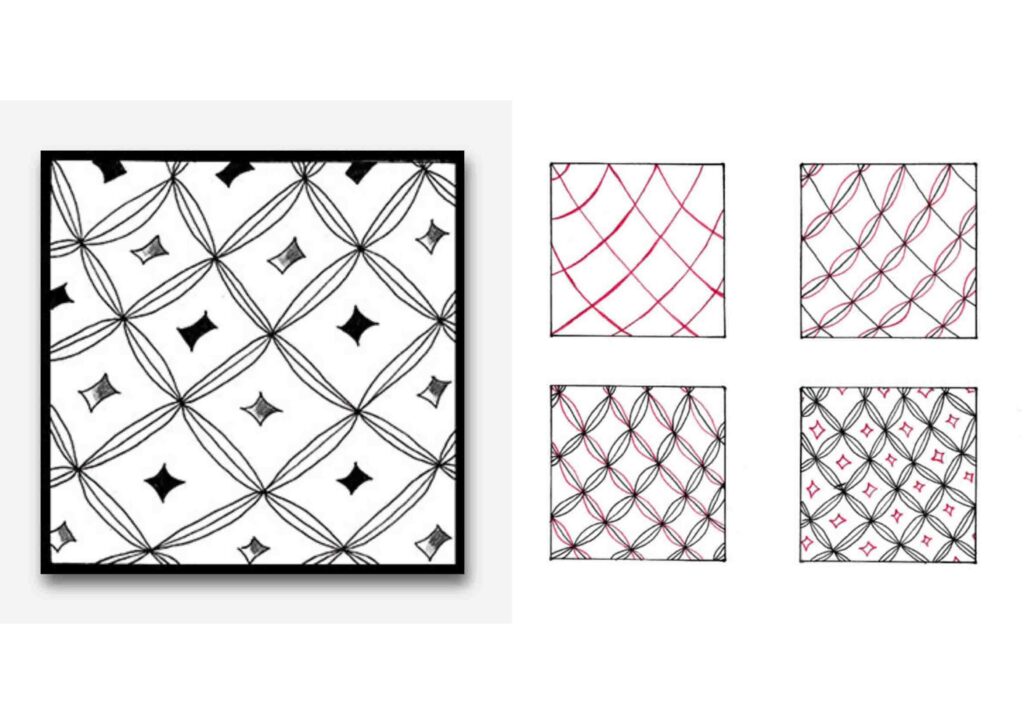
Step 1: Draw a series of evenly spaced curved lines sweeping diagonally across your tile in one direction, then repeat in the opposite direction so the two sets of curves cross over each other to form a loose flowing grid.
Step 2: Draw a second curved line running closely alongside each of the first, so every single line becomes a pair — the spaces between the pairs begin to form neat oval or eye shapes where they cross.
Step 3: Continue doubling up all the lines across the whole tile until every crossing point creates a clearly defined oval shape, and the pattern starts to look like a sea of overlapping petals or leaves.
Step 4: Draw a small four-pointed star shape in each of the diamond-shaped gaps between the ovals — just four short curved points meeting in the centre, like a tiny sparkling gem tucked neatly into every space.
7th Zentangle Pattern
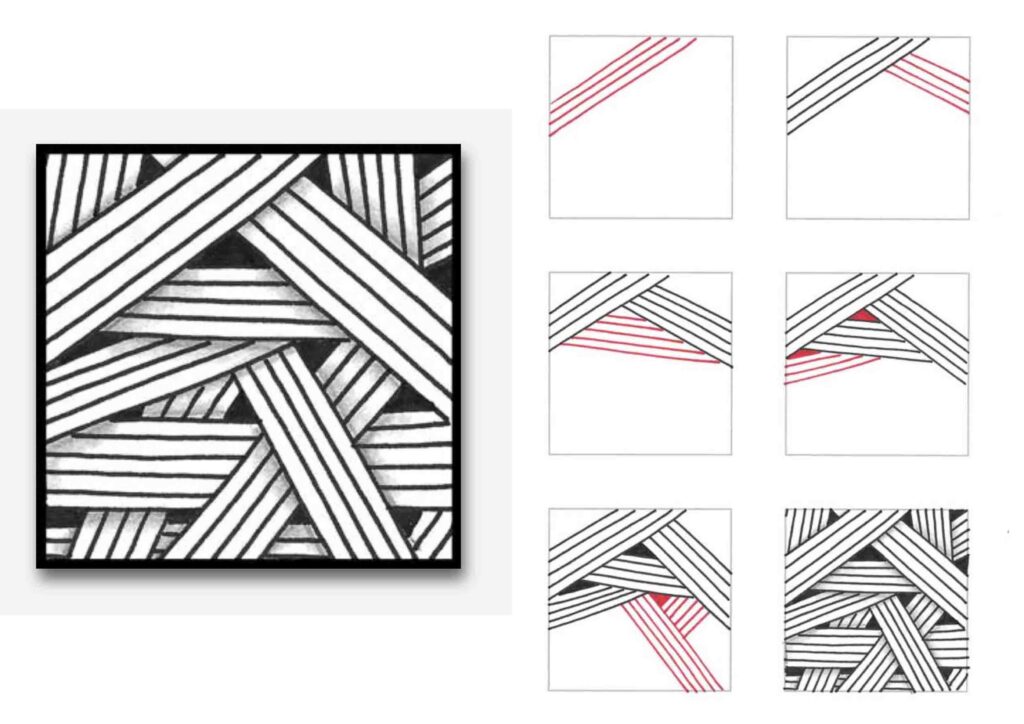
Step 1: Draw a bundle of four or five parallel lines diagonally across the upper corner of your tile, like a thick stripe cutting from one edge to another.
Step 2: Add a second bundle of parallel lines crossing over the first at a different angle, creating a bold X shape in the upper portion of the tile.
Step 3: Add a third bundle of lines sweeping across at yet another angle, weaving across the existing bundles and beginning to fill the tile with a criss-crossing layered effect.
Step 4: Where the bundles overlap, fill the small triangular gap between them with solid black, giving a clear sense of which bundle sits on top and which passes underneath — this is what makes the pattern look woven.
Step 5: Add more parallel lines inside each remaining gap and section, filling every shape with close neat stripes that follow the angle of their surrounding bundle.
Step 6: Complete the tile by filling every last section with parallel lines and solid black corners, so the whole page becomes a rich, interlocking weave of striped bands that looks bold, graphic and surprisingly complex.
8th Zentangle Pattern
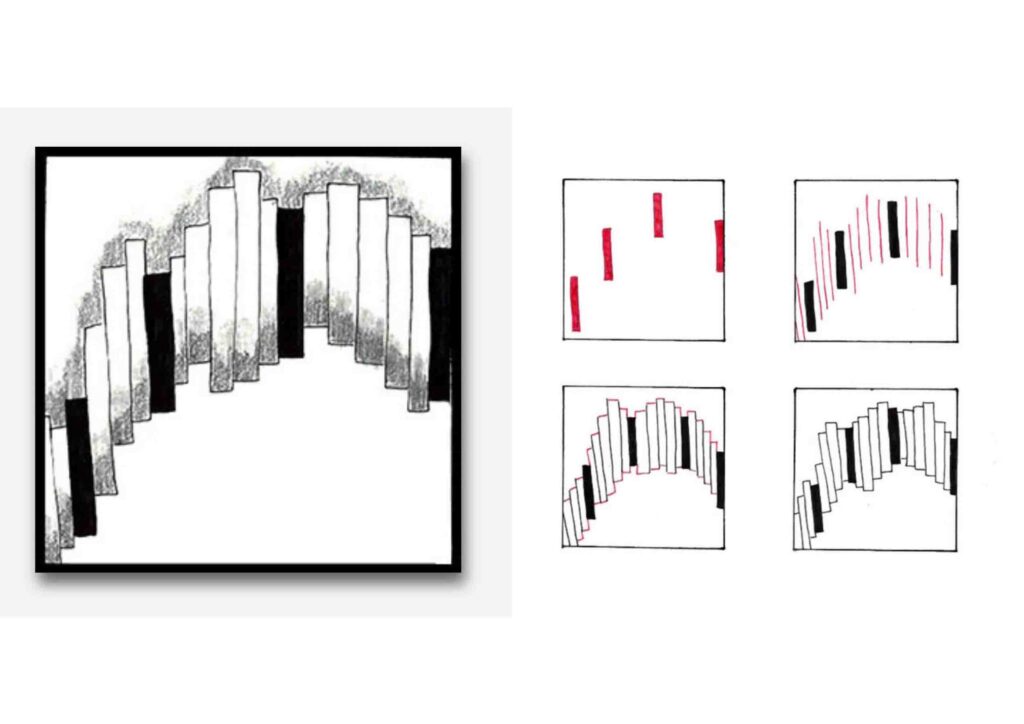
Step 1: Draw several solid black rectangles scattered across your tile at slightly different heights, varying their size a little — these are your anchor blocks and set the rhythm of the whole pattern.
Step 2: Fill in the gaps between the black rectangles with thin vertical lines, graduating in length so they step up and then back down, hinting at the arching shape that is beginning to form.
Step 3: Draw a large sweeping arch connecting the tops of all the rectangles and lines, then add an outline around each rectangle to turn them into open white blocks alternating with the solid black ones — like a row of piano keys curving across the tile.
Step 4: Refine all the outlines, making each block neat and clean. The alternating solid black and open white rectangles, all following the curve of the arch, come together to create a bold and graphic pattern with a satisfying sense of rhythm and movement — almost like a pipe organ or a sweeping musical scale.
9th Zentangle Pattern
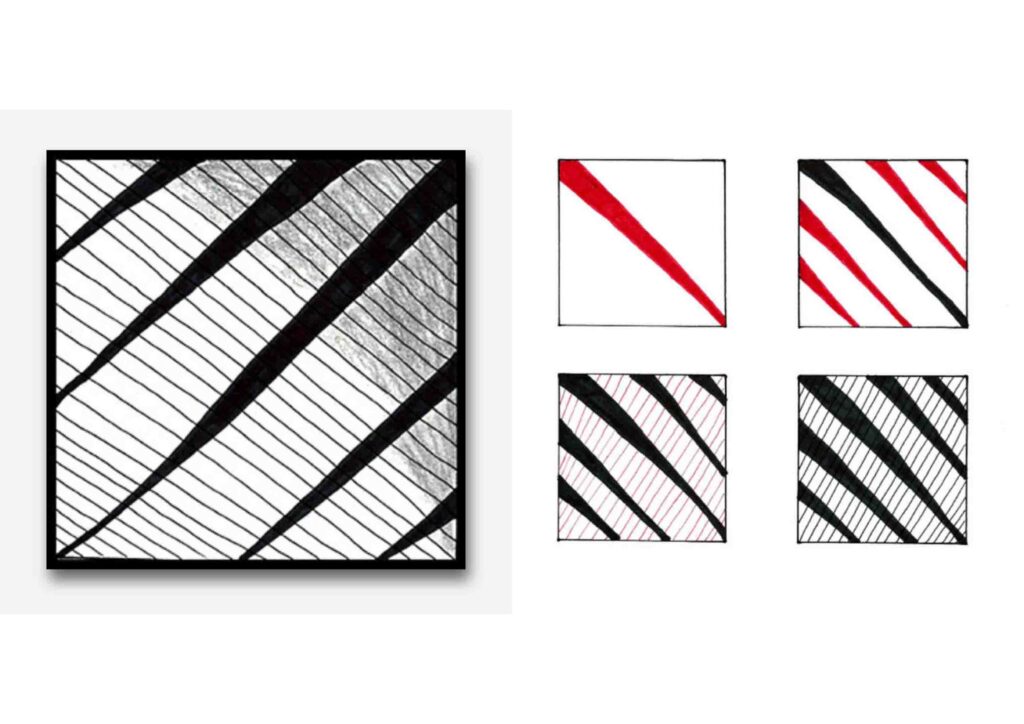
Step 1: Draw one thick diagonal band sweeping from the top left corner to the bottom right, filling it in solidly to create a bold stripe across your tile.
Step 2: Add two more thick diagonal bands running parallel on either side of the first, spacing them evenly so you have three bold stripes cutting across the tile with clear white gaps between them.
Step 3: Fill the white gaps between the bands with close parallel lines running in the same diagonal direction, keeping them neat and evenly spaced across the full width of each gap.
Step 4: Deepen the solid bands with dark pencil shading or solid black ink, and sharpen up the fine parallel lines in the white sections so the contrast between the two is crisp and clean.
The result is a beautifully simple but striking pattern of bold stripes and fine lines that has a real sense of depth and graphic confidence.
10th Zentangle Pattern

Step 1: Draw a large sweeping quarter-circle arc from one side of your tile to the other, curving out from the bottom left corner to create a bold flowing line across the space.
Step 2: Add a second curve running closely inside the first, but this time let it curve inward more sharply so the two lines meet at a point at one end, forming a long leaf or eye shape in the corner of the tile.
Step 3: Draw a third curve inside the leaf shape, echoing its outline and beginning to fill the interior with layered flowing lines.
Step 4: Keep adding more concentric curves inside the leaf, each one following the shape of the one before, until the whole leaf section is filled with a series of smooth flowing layers.
Step 5: Begin adding smaller curved shapes in the remaining spaces outside the leaf, filling each section with its own set of flowing concentric lines that follow the shape of their surrounding area.
Step 6: Fill every last section with tightly packed flowing lines and solid black ink in the smallest gaps, building up a rich, swirling composition that fills the entire tile — the finished result has the bold, dramatic feel of a Maori tattoo or Art Nouveau illustration.
11th Zentangle Pattern
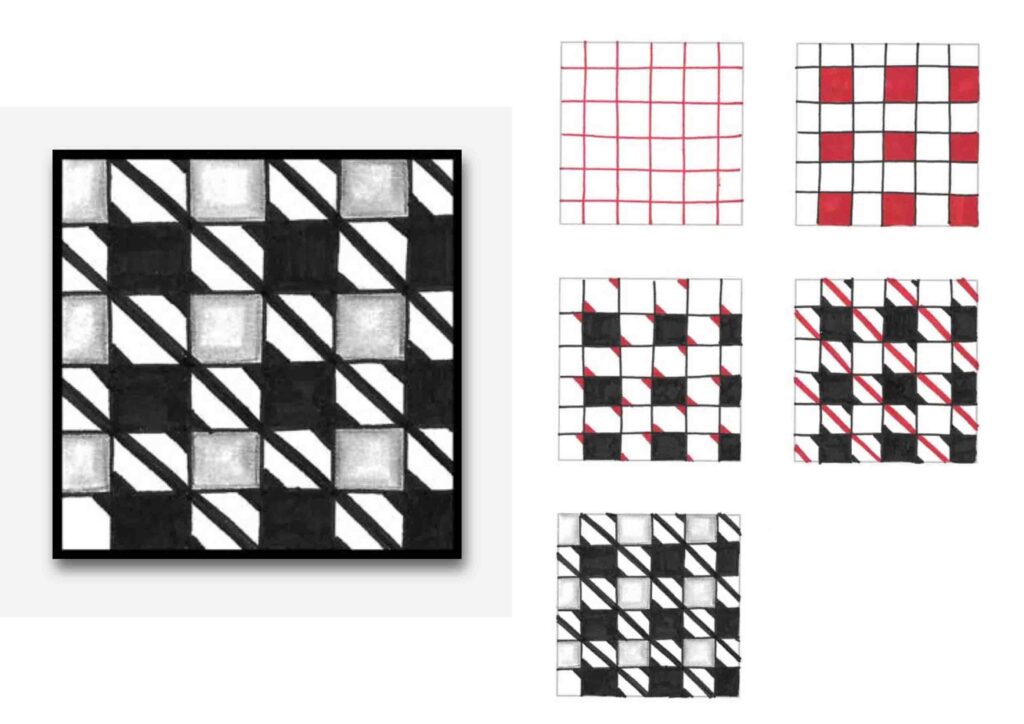
Step 1: Draw a simple grid of equal squares across your tile — four columns and four rows gives you a good foundation to work with.
Step 2: Fill every other square with solid colour in a checkerboard arrangement, so you have an alternating pattern of filled and empty squares across the whole grid.
Step 3: In each of the empty white squares, draw two bold diagonal lines cutting from corner to corner in the same direction, creating a strong striped effect that contrasts with the solid squares beside them.
Step 4: Add a second diagonal stripe to each white square, so every empty square now has three evenly spaced diagonal lines running through it.
Step 5: Darken the solid squares to a deep black and thicken the diagonal stripes in the white squares, making the contrast between the two really bold and defined.
Step 6: Add light pencil shading to the white squares between the stripes, softening them slightly so they appear to glow against the deep black squares — the finished pattern has a striking optical quality that makes the grid appear to shift and shimmer before your eyes.
Pin me for later!

And there you have it — 11 beautiful Zentangle patterns to inspire your next creative session! We hope this collection has shown you just how varied and versatile Zentangle can be, from flowing organic shapes to bold geometric designs.
Keep experimenting, keep practising, and most importantly keep enjoying every stroke — because every tile you create is uniquely your own.
If you liked this post, be sure to check out our other Zentangle posts below:
Create Easy Zentangle Art: A 10-Step Guide to Fun Patterns.
Easy Zentangle Flowers: 10 Fun Patterns To Doodle.
Be sure to give this post a share on Pinterest and give us a follow! Happy tangling!